Rig Trimming and Tuning – Making It All much easier Part 2

One sunny day racing at Chipstead, I noticed a lovely competitor measuring his mainsail twist with one hand using a battered bit of cardboard with two pen marks on it. Much easier than twelve inch steel rules and tapes.

“What gap are you looking for?”, I innocently asked. “Secret…”, came the reply!!!

Nine months after taking the plunge, my new K2 IOM arrived. It also has a full tuning and trimming guide with it. The main matrix page has literally 84 numbers on it….. that’s about 80 too many for the beginner!!

So what to do?? I remembered the piece of cardboard from Chipstead.

It is fashionable it seems that every row of a tuning matrix has settings for waves, and settings for flat water. If you set out to make a trimming tool, you can choose “flat” or “waves” or combination and knock 42 numbers out of the matrix straight away.

In the RedAnt Tuning matrix for the F6 Marblehead, I reckon that at the centre of thinking there are four numbers…. at the heart of rig set-up.

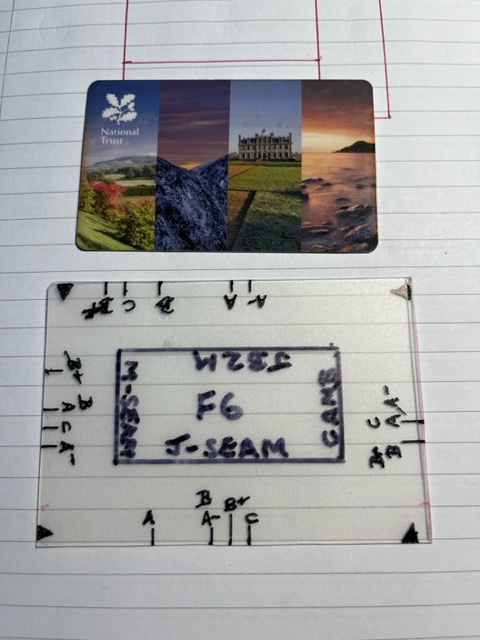
Now look at the photo above. I am using four sides of a kind of pocket ruler (100mmx60mm) to give me an F6 trimming tool. I have started by placing five rig settings on there – A with A- (both flat water) and B, B+ and C (all for waves).

After a quick fiddle in the garage so far, I’m very encouraged. I accidentally cut the tool out of semi-translucent plastic, which I now realise it vital – you sometimes need view it from the back. I used the plastic from the front cover of one of those spiral bound A4 notebooks that you see in the stationers..

If you cant find a notebook with plastic covers (cheapest route) then I spotted this box file in WH Smith this morning – approximately the same material as I used.

So on that bit of plastic, I hope to have 20 key variables and on any day I would use four of them. The precise numbers aren’t shown … “secret”!!

I reckon it’s five variables, not four, for my K2, …so slightly challenging for a four sided plastic ruler concept, but I’ve found a way. I’ve made separate K2 tuning tools, one for the Sunday Club (waves common) and one for the Wednesday club (always flat water).

Will it move me from the back of the fleet up to the middle ?! I doubt it…. !!

However, I reckon when you start out you have to quickly get to learn “what looks right”. ,… And experimenting with the trimming tool in the garage it quickly gets you to what the builder and sailmaker think “looks right”. …It helps. So I feel the main point of the trimming tool is to shorten the time (measured in years!) it takes the beginner to learn “what looks right”….. Then I hope to be mid-fleet!

Making Rig Tuning a Little Simpler – Part One

When you start radio sailing, quite quickly you notice the amount of attention that competitors pay to trimming and tuning their rigs.

Does it make a difference? Well, in our recent IOM meeting which was using six-leg courses, the leaders were finishing in around 12 minutes a whole leg in front of the competitors at the back. So setting God-like tactics, skill and good-looks to one side for the moment, superficially they are going about 15% faster. Amazing.

Confounding matters, the top competitors seem to do rig set-up by eye – no measuring rules or tape measures or anything. Sometimes you’ll see two or three fingers being thrust in a gap in the rigs. Baffling….. So where do you start??

I started radio sailing a little last year with a borrowed Britpop with BG sails. It’s a very popular combination. There is a public download on tuning and trimming from BG Sails.

Click to access bg_sails_rig_tuning_iom.pdf

Take a look at this tuning guide. It’s a cracking good read. In fact, take a look at the whole “Tips” section of the BG website.

Tomorrow, I’ll publish part 2 of this item – a pocket trimming tool ….

Drying Out the Inside of Your Boat After Sailing

After a pretty wet day’s sailing, I pulled the bung off the F6 Marblehead and let the water out, as you do. This prompted a couple of discussions with Clubmates, LT and GH. It seems that when they get home, they pump dry air through their boats to keep the electrics dry. Good thinking.

As an aside, my IOM has a massive wide pot aperture, so I thinking airing the hull and electric is less of an issue with that. You can almost put your hand in, it’s that big. If you have a 60mm pot in your IOM, you might think about this though.

We had a great discussion in the bar about whether it is best to push dry air in, or pull damp air out. I decided on the latter for me.

Prompted by LH, I ordered the bits from Amazon : 40mm USB powered computer fan with 3 speed switch, a hygrometer to measure progress, (total less than £20 I think) and for my spare room, a 2m USB extension cable. The pot in the F6 is the ubiquitous Sailsetc 60mm pot, so I ordered an extra pot and lid for £2.50 plus postage. Although you can get a pot lid separately and save £1, I reckon you need the whole thing so that when you drill a hole in the lid to suck the air out, you can hold the whole affair by the pot as you drill.

This is what it looks like with the fan in situ. Note I have glued it on the lid for now, but I suspect in the longer term I’ll bolt it on using M3 bolts. There is a 3 speed switch on the fan and in initial tests I ran it on the lower speed. You need the bung out obviously so that dry air gets in to displace the damp air coming out. The hole in the lid exactly matches the fan diameter.

LT also suggested a hygrometer to place in the airflow to monitor progress. Amazingly it costs about the same as London coffee.

This is what it looks like, when it’s running. Fingers crossed it works fine.

This was the fan we used from amazon:-

ELUTENG Mini 40mm 5V USB Fan Desk PC Fans with L/M/H 3 Adjustable Speed Portable USB Computer Fan USB Case Box Electronic Cooling Fan 5300 RPM with Metal Grill for Laptop/TV Box/AV Cabinet/PS4/Router

This was the hygrometer:-

Goabroa Mini Hygrometer Thermometer Digital Indoor Humidity Gauge Monitor with Temperature Meter Sensor Fahrenheit (℉)