Tag Archives: datchet radio sailing

Calibrate Your Backstays, Anyone??!!

When HS and I raced our International Dragon over at Medway Yacht Club, we were forever adjusting our backstay tension… just like radio sailing. Calibrating the rig so you could see and record what you were doing was just as vital – on backstays, …not as easy as it sounds!!

So for the same reasons, we constantly adjust backstays in radio sailing. What is a way to know “where you are” with your adjustment?

I was lucky enough to get a new IOM from SailboatRC last October. I’m only just getting to use it really. I bought the version of their package where the factory sets up all the rigs for you too. (Not that you’d notice in my results – ha ha !). On the three rigs (A,B,C) when they have the backstays set up correctly in the factory they run a fine black pen over the lines leaving you with a black dot on both sides of the loop. So line up the two dots, and you are back to where the standard factory setting – “voila”, I thought !!

The thing is that inevitably the owner, and at Datchet all the experts who come to help(!)… all have a tweak of the backstay. It’s quite difficult to see it clearly whether it’s your own hand on the bowsie in the way, or someone else’s.

So I went down to the stationers and bought a very fine permanent red pen plus the same thing in black. Now look at the photo above :-

On the bowsie side of the adjustment loop, I marked the factory dot in red colour. It is on the right hand side of this photo. Then I took the black pen and a ruler and placed, for now, a black dot 1cm above the factory mark and a second dot 1cm below the factory mark. It’s a 2:1 adjustment of course, but now I can see half a cm above and below the (centre) factory mark. I suspect I might have to add a further two dots, making five in total, but let’s see how we go.

Can You Cut Dyneema Line with Kevlar Scissors??

Just recently we published a couple of items on both dyneema line sizes and cutting them with dyneema scissors.

In my experimenting here, I happily got my dyneema lines out to find if there is any need for fuss about cutting it… there is!! My Stanley knife and scissor collection was useless.

I immediately googled “dyneema scissors” on Amazon and got the fright of my life … £40-£60 for a pair of scissors!! Tut tut NO!!! I noticed that kevlar scissors were about half the price, and so googled “can you cut dyneema with kevlar scissors?” and this interesting little video came up:-

You can never tell if these videos are genuine or not, can you? Anyway, I found on Amazon the exact Kevlar shears they use in this video – £20 !! Ordered a pair and they are great!! £20 sounds a lot, but at local coffee prices that’s only about 6 flat whites, and they’ll probably last a lifetime. I’m happy!!

It seems that a reason there may be so many kevlar shears out there to choose from is that this is the method of choice for cutting fibre optic cable. Who’d have known the big need for that ten years ago!

I’m less happy about sealing the rope-ends though. I’m using a keelboat rope burner from my toolbox at the minute – very quick, but leaves a bit of a blob. Might be OK. Sailboat RC recommend a quick swipe of THIN superglue along the line, cut it with your wife’s favourite ceramic kitchen knife, and then you can thread it through holes. I have a battery sealing knife in my toolbox – I must have dropped int once too often as it refuses to deal with dyneema or anything else at the moment. SailboatRC list a natty little USB plasma cutter – only 15 euros… but postage is 49 euros!! More research to do!

Increase Your Calibration and Reduce Your Development Time??

I suppose as a complete beginner, it’s natural to feel that it’s going to take a lot of racing before I get to move from back of the fleet to the middle !! “Started too late in life” is the key learning. Instead of waiting to end my keelboat racing then switching to radio sailing, I should have overlapped these two forms of sailboat racing – for about a decade!! One of the charming things for the beginner is to see fellow club members peering knowingly down their masts, flexing their back stays with their thumbs and watching their leech twist. It all looks a bit like black magic!!

The boats all come with a tuning guide of course. I must admit that I found the BG Tuning Guide very insightful. All the measurements are there, but when you watch club members the whole thing is a pretty “analogue” process. I’m surprised in a way because in dinghies and keelboats, calibrating your boat and rig is simply de rigour. Everyone does it.

I suppose if you cast your minds back to Flying Dutchman sailing in the early seventies – Rodney Pattisson, John Oakley, Keith Musto and all that – we get to realise that calibrating rigs and boats in sailing was just starting to “arrive”. I used a Club loan IOM to get going in 2022 and 2023, and was lucky enough to receive a new IOM just recently. It’s a very polished product – complete and ready to race out of the box etc – and I’m delighted to see some calibration in evidence. Someone, somewhere is thinking about this.

These are the first two things I notice on this IOM.

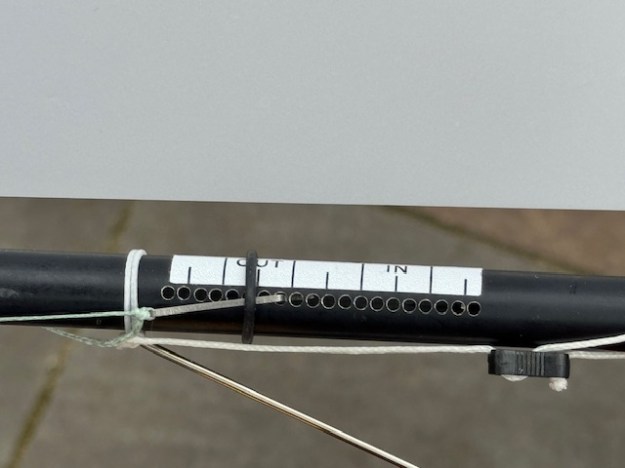
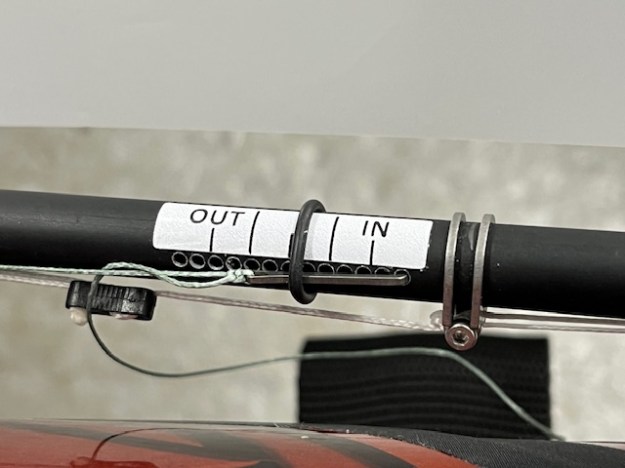
This is the arrangement for calibrating main and jib sheet adjustments. No bowsie, but instead hooks in a rack of holes. Comparing this with the other boat I have – which just has bowsie adjustment – this is much, much better. Precise, visual, repeatable and very easily changed. I cannot be the only beginner who finds adjusting with a bowsie means you go too far, not far enough, have to move your hands away to see what you’ve done, not measured etc. This is just much, much better. Very grown up.

Remember – bowsies can slip under load (see SailsEtc article about tests on this). This hook and rack method will protect you against that.

How do they drill those holes in the spars though?? I dare not try – I imagine it needs a carefully calibrated drill jig or something. If you know how it’s done, just leave a comment on this website entry.

Without the rack of drilled holes, even simple calibration tape so that you can read where your bowsie is, would help a lot. I’ve ordered some calibration tapes from SailsEtc to see what they have in stock that might help. However, narrow strips of tape with simple markings would help see where you are. I’m using it a lot on the IOM already.

At the factory, the supplier marked up the back stays with two black dots to correspond to their recommended measurements. It’s good and I am trying it on other lines. Just line up the dots and that’s your starting position. I should maybe refine it so there is one red dot, and on the other line a row of dots maybe 5mm apart. That might work. It’s simply to help the learner find the “starting point” each race day before detail adjustments inevitably follow.

Note to self – make sure tool box has ultra fine permanent pens in both red and black inks.