Our third radio sailing transmitter guide has just gone online – this time for Spektrum !
All our latest transmitter features are in there. Take a look if you can ! Errors, omissions and amendments gratefully accepted. Just email them in via our Contact page.
To read it, click on RADIOS in the Menu Bar above.
There’s enough to get your mind around when you start radio sailing, isn’t there?! You take some pieces of kit for granted naturally (!).
Probably within one or two outings, you’ll have adjusted, or simply fiddled with, your mainsheet post and perhaps wondered, “What’s down there?”…. “can you adjust the friction?” etc
Probably most of us (UK) are using Sailsetc mainsheet posts. Both mine are made of a kind of slippery PTFE type material and the crucial thing above deck are the entry and exit holes.
On my IOM, the post is at a racy angle,… and on the Marbleheads it is simply vertical.
The post slides snugly into a tube below deck. What’s underneath?? Well, carefully slide it out and let’s take a look at what you will see…..
The most crucial thing is that you will immediately see how to adjust the sliding friction. Your post might feel just right and hold its position. You probably know that the general idea is (1) adjust the post as high as is feasible on sailing day so that your mainsheet run to the boom is near horizontal (2) on a gusty day, consider sliding the post down little to make the rig slightly more springy.
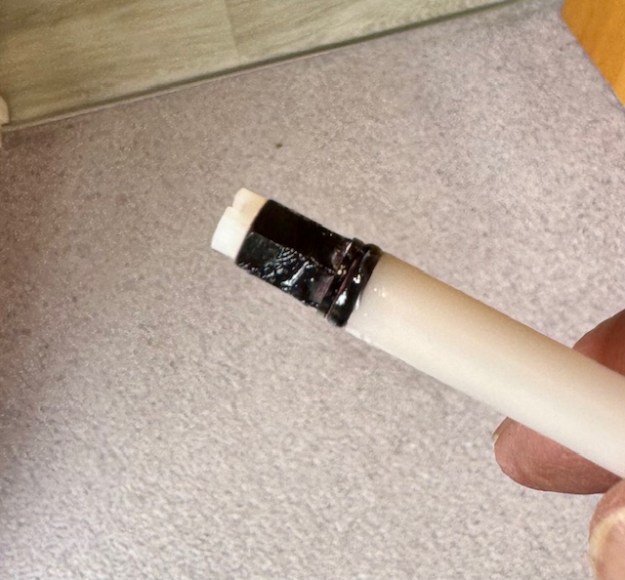
There are three components down there:-
A nylon bolt (white in this example) which screws into a pre-tapped hole in the bottom of the post. On this one, you just need a flat head screwdriver or a weeny spanner.
There’s your first adjustment right there. The limit of how far you can push the post down the tube is set by that screw head which will sit at the bottom of the tube in its furthest down position. The further you screw it in, the lower your post can sit.
On the post is an adjuster nut (black in this example) then a little rubber washer on the end. There’s your second adjuster. The tighter that nut screws the rubber washer to the bottom of the post, the more the rubber washer bulges…. the more it presses on the wall of the tube… the stiffer your height adjustment gets.
That’s it !! Pull your post out and take a look!! Clever in its simplicity.
A story of a third adjustment:
We may be wrong, but yesterday it looked on my Marblehead B and C rigs as if my mainsheet post did not quite want to go down low enough. It was catching the boom on both rigs as they travelled across, and I couldn’t quite deploy enough kicker to close the leech enough… so I had a free leech kind of sailing day.
I was hoping to simply screw the adjuster in a couple of mm’s to get the minimum post height down a bit. No such luck…. the screw was right in. So in a fleet conference (!) we resolved that I should instead take 5mm off the post.
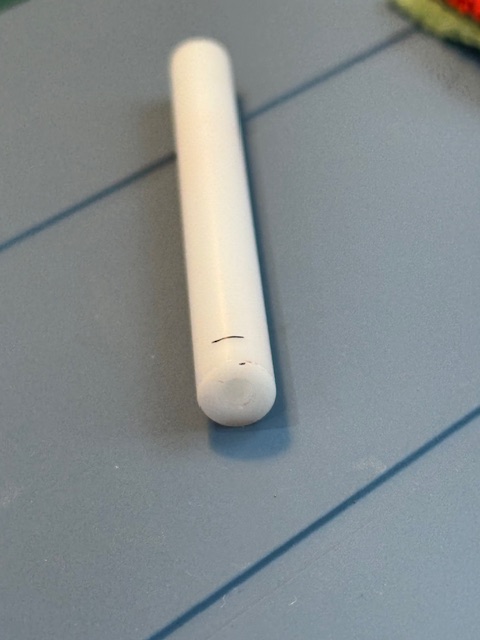
See that little black mark on the post casing above?
You don’t want to go lower than the exit eye clearing the deck (see top photo), but there’s essentially lots of adjustment available in the tube once you get the limits right.
In a gentle vice, I found it reasonably easy to cut with a very fine hacksaw and cleaned up with a file. Taking 1-2mm off would have been tricky, but 5mm was fine.
Then, as you’d guess (Murphy’s law applies), the screw hole wasn’t quite deep enough to get the adjuster screw in. I didn’t fancy making the hole deeper and re-tapping the thread. There was a generous amount of thread showing on the bolt, so I resolved to take 5mm off the end – a Stanley knife and a snipper did the job rather nicely.
Should be OK – we need another 15mph gusting 30mph day to give it a trial run.
I don’t have one aboard the Marblehead (weight!), but my K2 One Metre has a lovely shiny red one, located on a printed mount as part of the pot….looks great! It gives out a delicious “click” with a lovely “ding dong” when you press it! …And you don’t really need one….
All this came about because my One Metre did a sail-away on Sunday in stiff B Rig breezes. I’ve not been sailing all that long and this is already the second sail-away that I’ve had. The Marblehead went for a run in early 2024. I’m suddenly very focussed on this issue….
We were a few seconds into pre-start manoeuvres and suddenly “no control”. I guessed it was a power drop as failsafe didn’t seem to have time to kick in – off it went to the horizon. Datchet is pretty big.
The Datchet RIB team were great, but you can sail a long way there before you hit shore. I estimated the boat would make shore at Windsor Castle…. Anyway – the RIB team brought it back safely.
How to Diagnoseand the Hot Tip
If you’ve had a power drop, you may have already read our “How to Diagnose” when the answer was a winch failure. You can find it elsewhere on this website.
On my sail-away yesterday, the amazing GH put on his Doctor Hetem outfit and got to this issue AND the repair very quickly. He took about two minutes – so embarrassing!!
1/ Check battery is up to charge and swap it anyway for a new one. Do all the connectors look secure on the receiver and anywhere else you can see or touch? The connectors were all good in our case. The boat was also dry inside.
2/ Dig the receiver out so you can see it, and activate the switch. On most receivers there should be a light to show power is there and probably that signal is being received. On a Futaba receiver, the red LED goes green…. As we prodded the switch, the green light would glimmer for a moment then extinguish. “Looks like we have a switch problem”, said Dr Hetem. It took about 30 seconds to get this far.
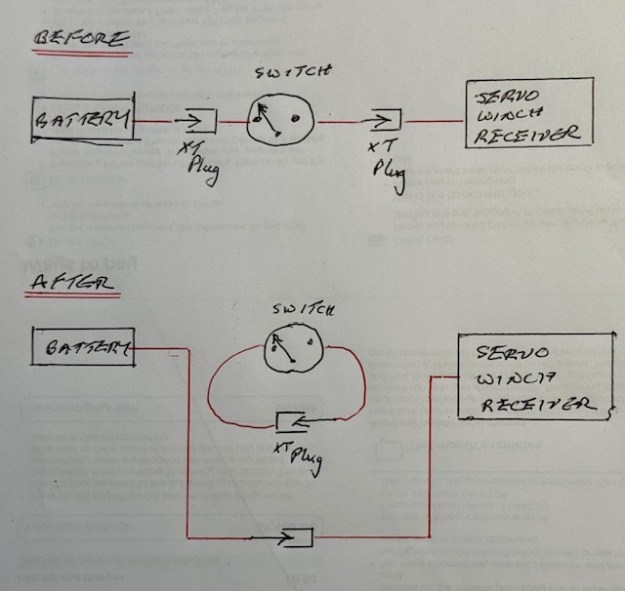
My brain was wondering about taking the boat home, extracting the switch, buying a new one, then the wiring, recabling and all sorts. The boat doctor simply said, “Let’s cable out the switch and isolate it…”
GH just quickly saw how to cable past the switch and seal up the old circuit in a closed loop. He quite simply swapped the XT plugs over – see the diagram above. That took around 20 seconds. The boat sprang into life immediately.
So no worries about removing or replacing the switch, and no downstream re-weighing by the measurer. Just leave everything in there sealed up but “no switch to go wrong”.
If I’d known that, I have done it straight away when I took delivery !!
Post Script :
Did you know that you can power the boat by plugging the battery directly on to the receiver? My Marblehead was originally cabled to take the battery to the winch and then power around the boat. We now take the battery into one of the spare channels on the receiver via a little cable with a futaba receiver connector on one end and an XT on the other. Everything is powered from there and it maximises the likelihood that the receiver keeps power. Very clean and simple.