It wouldn’t be so uncommon that the shaft of your Radio Sailing rudder gets bent for some reason.
What do you do about it?
Quite obviously you’d be inclined to grab the fin on one hand, and straighten it with the other. STOP !!
We had this at Datchet at the weekend. The problem is that the walls of the fin around the shaft are very very thin. The slightest application of leveraged pressure on the shaft might rip the sides of the fin off.
So what’s a way to prevent this? Lay a strip of wood each side of the top of the fin. Clamp them somehow to give the fin walls effective extra strength with the wood strips locked on. Do your straightening, then release the vice grip and take the wood strips away. Is the sidewall of the fin still intact on each side? Hope so !!
When you get going with your radio sailing, just occasionally you are going to need to replace your deck patches. The trick to make positioning them easy is the use a washing up liquid solution just strong enough to leave a film across the surface before you apply. Then you just need five hands to get them on – ha ha ha !!
Have you thought about how cut a stock of new patches? Rolls of sticky back sailcloth in all sorts of colours are available from the likes of Sailsetc
Then you need some templates. I found that to cut templates in thin ply is insanely challenging to get precisely right, symmetrical, even corners etc. So in an attempt to find a way forward, I asked my expert seamstress wife how a dressmaker would approach the problem. The answer is that you go through an intermediate paper pattern stage.
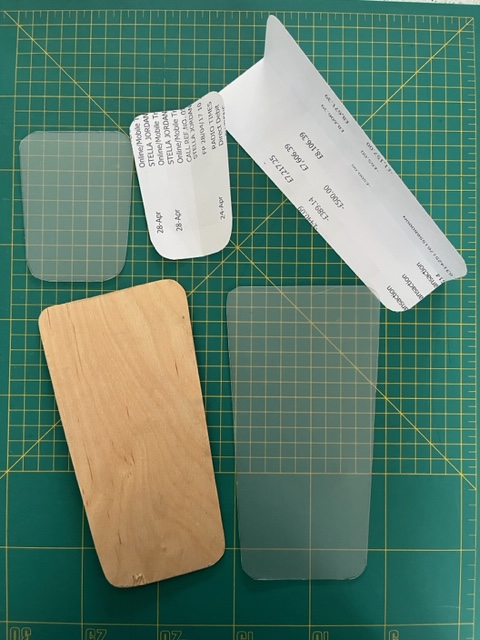
(See photo) To get the symmetry and corners to match, fold the paper in the bow to stern axis down the middle. Then make your marks, cut it out and test it on the boat hatches. Re-do this as many times as you need to get the angles, sides and corners just perfect.
We decided then to transfer that shape to sheets of plastic off the back of an old A4 notebook (see the item on “Rig Trimming Tool”….used the same plastic sheet for this) Something thin enough to cut accurately with a scissors, but last a jolly long time in wet conditions and lumpy toolboxes. …Trace the paper pattern on to the plastic sheet, cut with the scissors and you have your template. Easy!! Should last longer than the boat!
After a pretty wet day’s sailing, I pulled the bung off the F6 Marblehead and let the water out, as you do. This prompted a couple of discussions with Clubmates, LT and GH. It seems that when they get home, they pump dry air through their boats to keep the electrics dry. Good thinking.
As an aside, my IOM has a massive wide pot aperture, so I thinking airing the hull and electric is less of an issue with that. You can almost put your hand in, it’s that big. If you have a 60mm pot in your IOM, you might think about this though.
We had a great discussion in the bar about whether it is best to push dry air in, or pull damp air out. I decided on the latter for me.
Prompted by LH, I ordered the bits from Amazon : 40mm USB powered computer fan with 3 speed switch, a hygrometer to measure progress, (total less than £20 I think) and for my spare room, a 2m USB extension cable. The pot in the F6 is the ubiquitous Sailsetc 60mm pot, so I ordered an extra pot and lid for £2.50 plus postage. Although you can get a pot lid separately and save £1, I reckon you need the whole thing so that when you drill a hole in the lid to suck the air out, you can hold the whole affair by the pot as you drill.
This is what it looks like with the fan in situ. Note I have glued it on the lid for now, but I suspect in the longer term I’ll bolt it on using M3 bolts. There is a 3 speed switch on the fan and in initial tests I ran it on the lower speed. You need the bung out obviously so that dry air gets in to displace the damp air coming out. The hole in the lid exactly matches the fan diameter.
LT also suggested a hygrometer to place in the airflow to monitor progress. Amazingly it costs about the same as London coffee.
This is what it looks like, when it’s running. Fingers crossed it works fine.
This was the fan we used from amazon:-
ELUTENG Mini 40mm 5V USB Fan Desk PC Fans with L/M/H 3 Adjustable Speed Portable USB Computer Fan USB Case Box Electronic Cooling Fan 5300 RPM with Metal Grill for Laptop/TV Box/AV Cabinet/PS4/Router
This was the hygrometer:-
Goabroa Mini Hygrometer Thermometer Digital Indoor Humidity Gauge Monitor with Temperature Meter Sensor Fahrenheit (℉)