We have just published version 9 of our Radio Sailing Guide for the Futaba T6k.
Earlier this year, mega-star yachtsman, Ken Read published a one hour Youtube video on setting up the DF95. The last part of the video is about exploiting the transmitter.
In his concept, he uses one of his two-position switches to give himself an upwind mode and a reaching/downwind mode for mainsheet sensitivity.
We have taken this idea and added it to our “Advanced Topics” section of the manual. We have used a three position switch on the Futaba to give us Normal, Pinch and Puff Modes. We have integrated Ken Read’s idea into our “Puff Mode”. See section 4.2.3.3 of our manual to see how you can give it a try.
Go to the “Transmitter Manuals” Category of this website, or use the Search Bar.
I suppose as a complete beginner, it’s natural to feel that it’s going to take a lot of racing before I get to move from back of the fleet to the middle !! “Started too late in life” is the key learning. Instead of waiting to end my keelboat racing then switching to radio sailing, I should have overlapped these two forms of sailboat racing – for about a decade!! One of the charming things for the beginner is to see fellow club members peering knowingly down their masts, flexing their back stays with their thumbs and watching their leech twist. It all looks a bit like black magic!!
The boats all come with a tuning guide of course. I must admit that I found the BG Tuning Guide very insightful. All the measurements are there, but when you watch club members the whole thing is a pretty “analogue” process. I’m surprised in a way because in dinghies and keelboats, calibrating your boat and rig is simply de rigour. Everyone does it.
I suppose if you cast your minds back to Flying Dutchman sailing in the early seventies – Rodney Pattisson, John Oakley, Keith Musto and all that – we get to realise that calibrating rigs and boats in sailing was just starting to “arrive”. I used a Club loan IOM to get going in 2022 and 2023, and was lucky enough to receive a new IOM just recently. It’s a very polished product – complete and ready to race out of the box etc – and I’m delighted to see some calibration in evidence. Someone, somewhere is thinking about this.
These are the first two things I notice on this IOM.
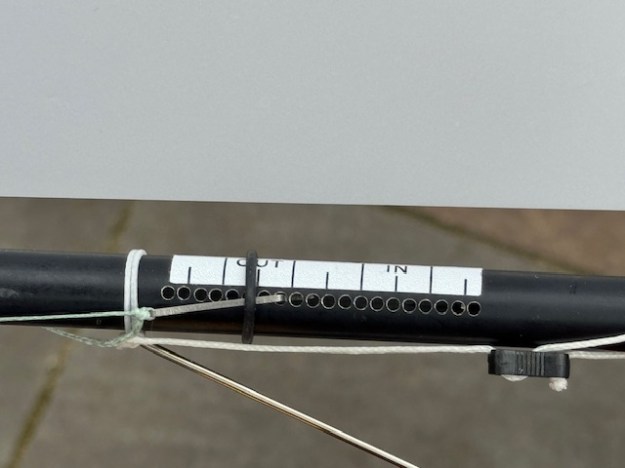
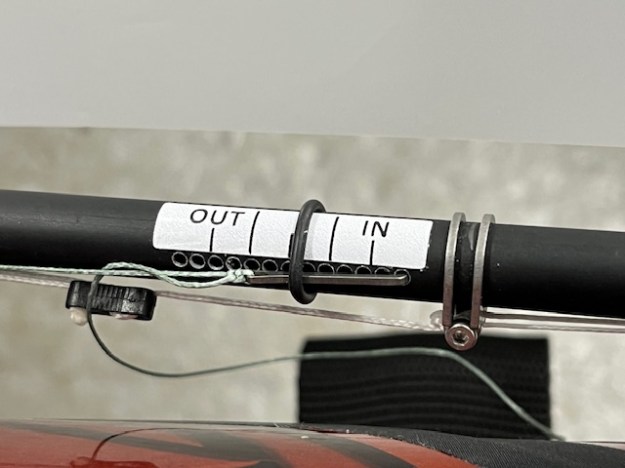
This is the arrangement for calibrating main and jib sheet adjustments. No bowsie, but instead hooks in a rack of holes. Comparing this with the other boat I have – which just has bowsie adjustment – this is much, much better. Precise, visual, repeatable and very easily changed. I cannot be the only beginner who finds adjusting with a bowsie means you go too far, not far enough, have to move your hands away to see what you’ve done, not measured etc. This is just much, much better. Very grown up.
Remember – bowsies can slip under load (see SailsEtc article about tests on this). This hook and rack method will protect you against that.
How do they drill those holes in the spars though?? I dare not try – I imagine it needs a carefully calibrated drill jig or something. If you know how it’s done, just leave a comment on this website entry.
Without the rack of drilled holes, even simple calibration tape so that you can read where your bowsie is, would help a lot. I’ve ordered some calibration tapes from SailsEtc to see what they have in stock that might help. However, narrow strips of tape with simple markings would help see where you are. I’m using it a lot on the IOM already.
At the factory, the supplier marked up the back stays with two black dots to correspond to their recommended measurements. It’s good and I am trying it on other lines. Just line up the dots and that’s your starting position. I should maybe refine it so there is one red dot, and on the other line a row of dots maybe 5mm apart. That might work. It’s simply to help the learner find the “starting point” each race day before detail adjustments inevitably follow.
Note to self – make sure tool box has ultra fine permanent pens in both red and black inks.
So maybe you’ve just bought your first boat only to find you need to separately find yourself a transmitter? Or you just will get a new one?
The first thing you find when you google it, is that there are lots out there. On many occasions, you’ll land on a website only to discover that the seller splits the transmitters into “Air” or “Surface”. …. Baffling.
Before the modern wave of 2.4ghz radios it seems that it was thought better to help prevent signals on radio control race cars accidentally being picked up by a radio controlled plane overhead – and crashing them to the ground. So it was prudent to split frequencies – or at least I think that was the idea. To this day, you will see that MYA Entry Forms still ask for wavelength, a legacy of those days I guess – and we all fill in “2.4ghz”. Our radios all pair precisely to the receivers in our boats – no problems.
A manufacturer legacy of those days is still to classify their transmitters as either Air or Surface. You see that on seller websites a lot. Now before you immediately go and look at “Surface transmitters” as we sail on the surface…. Stop!! You want to look at “Air Transmitters”. We use airplane type transmitters for sailing.
It looks like “Surface” designs now tend to be pistol grips (rc cars?) and “Air” designs have the twin joysticks that radio sailors use.
So : You want to look for “Air” and “Mode 2”, the latter being about the way the joysticks are arranged. Mode 2 is rudder on the right. That’s what we use.
You might also come across the term “Open TX”. For now, just ignore this. This is the transmitter manufacturer equivalent of linux in the home computer world – free shared industry software for driving the transmitter as opposed to manufacturer proprietary software. There are pluses and minuses – and you’ll be wondering about those as you read. It should in theory make it all cheaper in the long run. At the present, Radiomaster, FrSky, Jumper and one or two others have adopted OpenTX.