Have you tried cutting dyneema with a nice clean finish? It’s pretty difficult… when you try to slice it sort of scoots down the blade.
It seems the answer is “dyneema scissors”. Try keying that into amazon and see what you get…. quite a few!! It seems that the scissor blades have slight serrations – and that helps hold the dyneema in place as you cut.
A fellow new member, SM, at Datchet had a December problem of being unable to remove his rig after racing and put it down to a possible corrosion at the mast step. It is conceivable isn’t it? I’ve attached a little article about it below.
SM also introduced me to a new verb, as in “I had to dremel it out”. This got me going, I must admit. It turns out that a dremel is a little re-chargeable battery powered multitool – all sorts of bits and drills can go on the end. There’s a few different brands with similar, but not a bad thing for at least one club member to have in his car boot on a race day. About £40-£50….
Try this link below. Could be good birthday present idea!
When we all decide to come to radio sailing, one of the first things that grabs our onshore attention is people staring down masts with their knowing one-eyed look, tweaking stays with their sturdy race tuned fingers … and making clever approving noises. It’s great !
The curve of the mast is an interesting topic in itself. If you search Youtube for IOM videos you’ll hear experts looking for anything between “dead straight mast” to “a bit of prebend”.
Baffling, but fear not!!
On Nigel Barrow’s excellent website, he recommends a rig tension gauge by John Gill. It looks like this…
The sharp-eyed amongst you will notice John’s email address on the gauge if you want to contact him to get one. It’s a lovely carbon fibre thing – I just love it. Anyway, as Nigel points out, if you want to demystify your rig, get one of these.
If you are a keelboat sailor in your past, you’ll immediately recognise the basic idea. If you’ve had a Loos Gauge in your history, it is basically the same idea. I raced `Flying Fifteens for 25 years – the Loos Gauge is the central calibration measure for everything. I never went anywhere without mine. Honestly.
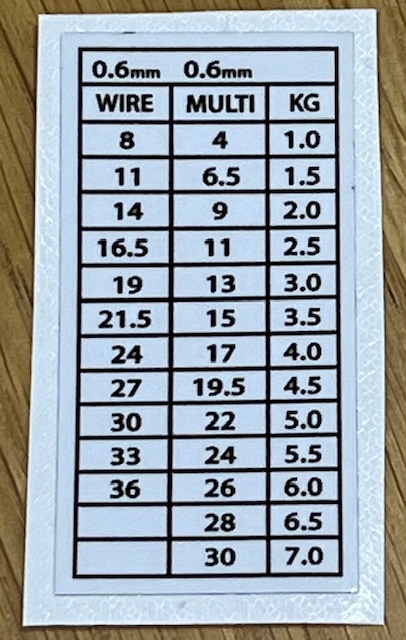
See those two big screws at the top of the gauge? You slide your shroud wire between those two (they stand proud) and the gauge gives you a way to understand rig tension versus deflection. Then you look up the gauge reading on a little chart, and if you know your wire diameter then you can read your tension in kgs.
We used to do the same in Flying Fifteens, but I soon lost the appetite to know tension in kgs … all you need to know is what the damn gauge number is.
If you look at John Gill’s photos above, you’ll see the way to use the gauge. (a bit blurred, sorry)
As Nigel Barrow points out, it’s quite a revelation to know precisely if your IOM shrouds are carrying the same tension, or you pop a new replacement shroud in and you want to get the tension matched again. Very good.
In 2024 I set myself two other goals:-
I want to get a feeling of also what backstay tension readouts correspond with apparently good performance
Now what about Marbleheads? No shrouds…. But actually rig tension is a very black art in the Marblehead, and there must be a way to shine some light into my darkness. I want to write separately about measuring jib swivel tension on a Marblehead – but give me time.
Calibrate, calibrate, repeat, repeat…. my New Year Resolution for 2024